Open Icloud Photo Library On Mac
- Open Icloud Photo Library On Mac Download
- Icloud Photos
- Icloud Library Not Updating
- Download Icloud Photo Library To Pc
Oct 28, 2019 How to back up your iCloud Photo Library; Now, open your other Mac, and launch Photos. If you have an iPhoto library on that secondary Mac, follow the same steps as above — import your library, then turn on iCloud Photo Library. If you have duplicates of the same photo on each computer, iCloud should automatically resolve those conflicts when. All your photos on all your devices. ICloud Photos gives you access to your entire Mac photo and video library from all your devices. If you shoot a snapshot, slo-mo, or selfie on your iPhone, it’s automatically added to iCloud Photos — so it appears on your Mac, iOS and iPadOS devices, Apple TV, iCloud.com, and your PC.
Your Photos library holds all your photos, albums, slideshows, and print projects. If your library is large, and you want to free up storage space on your Mac, turn on iCloud Photo Library and use Optimize Mac Storage, or move your library to an external drive.
Before you start, be sure to back up your library.
Prepare your drive
You can store your library on an external storage device, such as a USB or Thunderbolt drive formatted as APFS or Mac OS Extended (Journaled).1 Find out how to check the format of your external storage device.
To prevent data loss, Apple doesn't recommend storing photo libraries on external storage devices like SD cards and USB flash drives, or drives that are shared on a network.
Move your Photos library to an external storage device

- Quit Photos.
- In the Finder, go to the external drive where you want to store your library.
- In another Finder window, find your library. The default location is Users > [username] > Pictures, and it's named Photos Library.
- Drag your library to its new location on the external drive. If you see an error, select your external drive's icon in the Finder, then choose File > Get Info. If the information under Sharing & Permissions isn't visible, click , then make sure the 'Ignore ownership on this volume' checkbox is selected. If it's not selected, click to unlock it, enter an administrator name and password, then select the checkbox.2
- After the move is finished, double-click Photos Library in its new location to open it.
- If you use iCloud Photo Library, designate this library as the System Photo Library.
Delete original library to save space
After you open your library from its new location and make sure that it works as expected, you can delete the library from its original location.
In a Finder window, go back to your Pictures folder (or whichever folder you copied your library from) and move Photos Library to the trash. Then choose Finder > Empty Trash to delete the library and reclaim disk space.
May 17, 2012 To access the Library folder, open the Finder and then, while viewing the Go pull-down menu, hold down the Option key to see the Library. It shows up between the Home and Computer menu options. Open the Library folder and select the column view so that you can see the Library folder itself (and not just its contents). May 01, 2019 Alternatively, you can try this method: Open a Finder window. Select Go - Go to Folder. In the menu bar. Type /Library in the input field and click Go. 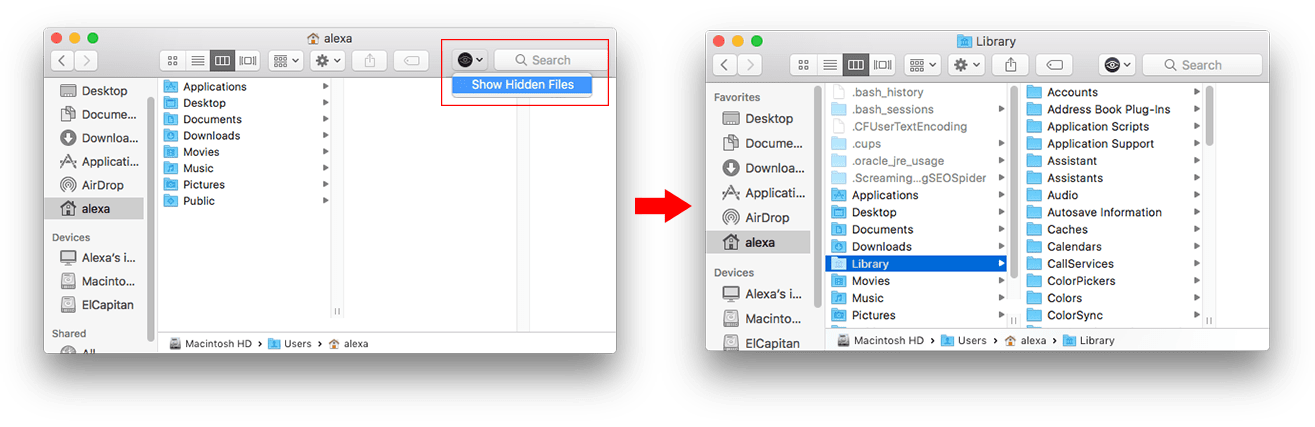 Dec 31, 2019 In order to get started and always make your Mac’s Library folder visible, follow the simple instructions below. Use Terminal to Make Library Folder Always Visible – Mac. In order to make the Library folder always visible on your Mac, you’ll have to use the command line. For those of you who don’t know, the command line is text interface on your Mac, that accepts commands from you, which. Dec 13, 2016 From now on, you should be able to access the Library folder from any window of the Finder app. To do that, you just have to pull down the Go menu and click on “Library,” and you should be inside the Library folder for your user account. So, that was a permanent method to enable the Library folder in the Finder menu on your Mac. Jan 12, 2020 How to Make the Library Visible Permanently. Launch Terminal, located in /Applications/Utilities. Enter the following command at the Terminal prompt: Press Return. Once the command executes, you can quit Terminal. The Library folder will now be visible in the Finder. Should you ever wish to set.
Open another Photos library
If you have multiple libraries, here's how to open a different one:
- Quit Photos.
- Press and hold the Option key while you open Photos.
- Select the library that you want to open, then click Choose Library.
Photos uses this library until you open a different one.
Learn more
If you have a permissions issue with your library, you might be able to resolve the issue by using the Photos library repair tool.
1. You can't move your library to a disk that's used for Time Machine backups.
2. If the volume isn't formatted APFS or Mac OS Extended (Journaled), or has been used for Time Machine backups but hasn't been erased, this checkbox will either not be present, or won't be selectable after unlocking. Erase and reformat the drive for this option to be available.
The iCloud Photo Library is one of those “where have you been all my life” kind of apps. Once you’ve started using it, there’s no going back. The iCloud Photo Library lets you sync your photos across all other devices meaning your precious memories are with you at all times and completely safe should anything happen to your device.
Before we show you how to set up the iCloud Photo Library and how to access iCloud on Mac, there’s a bit of housekeeping we need you to take care of.
How to keep no junk in iCloud
One of iCloud’s great features is that it automatically backs up all of your photos. So when you’re out happily snapping away with your iPhone camera, iCloud will work in the background to add all of your images to the Photo Library so that you can instantly access them on your Mac when you get home.
However, as you’re going to be setting up the Library for the first time, your Mac will automatically start syncing every image that already exists on your computer to iCloud. There are two reasons why this might not be ideal:
- There are photos on your Mac that you don’t want, or need, uploading.
- The iCloud Photo Library only comes with 5GB of free storage. More storage costs a minimum of $0.99 (USD) a month.
So, before switching on the Photo Library, it’s worth clearing out some of your iPhoto junk. CleanMyMac X lets you do this in a few clicks, using its smart scanning tool to only remove photos that you no longer need, such as pre-rotated or pre-cropped shots.
Here’s how to use CleanMyMac to clean up your iPhoto folders.
- Download CleanMyMac (you can do that here, for free).
- Launch CleanMyMac and click on Photo Junk from the sidebar menu.
- Your default photo library is already pre-selected to be scanned, but can easily be changed by clicking on Change Library.
- Hit Scan.
- Then hit Clean.
That’s it! No more useless photos poised to take up precious iCloud space.
Open Icloud Photo Library On Mac Download
Setting up the iCloud Photo Library
Okay, you’re ready to start syncing your photos. Before turning on the iCloud Photo Library make sure that you’re running the latest version of macOS. You can check for updates by going to Apple Menu > System Preferences > App Store and clicking on the Updates tab. While you’re there, check that “Automatically check for updates” and “Download newly available updates in the background” are selected, this will ensure you never miss a new update. Then, check that you’re signed to iCloud with the same Apple ID that you use across all devices.
To turn on the iCloud Photo Library, go to System Preferences > iCloud. Next to Photos, click Options, then select iCloud Photo Library.
Your photos will now automatically begin uploading to the iCloud Photo Library. Depending on the size of your collection and your internet speed, the process might take some time. Fortunately, you don’t have to upload everything at once. Your Mac lets you pause the upload whenever you like.
To do this, open up the Photos app, select Photos, then click on Moments. Scroll to the bottom of your photos and hit the Pause button.
A Movie Organizer Software can help users to surf through their personal collection of movies quickly, tag movies, surf the web for information, links or reviews, add notes, etc.This software helps users to classify and categorize their movie collection on computer hard disks, CDs, DVDs and VHS tapes. Music Organizer Software; Video Library. Home video library software mac.
How to Access iCloud Photos on Mac
The iCloud Photo Library really doesn’t change anything in terms of how you view or manage your photos. To view photos synced to iCloud, open up the Photos app — they’ll all be there, just like before.
The Photos app is also the place to manage your storage space. iCloud offers an “Optimize Mac Storage” feature that stores full-resolution photos and videos in iCloud and keeps originals on your Mac (if you have space). It’s a feature worth using alongside CleanMyMac to better manage your free space. To enable the feature, click Photos > Preferences and select Optimize Mac Storage.
If you decide that 5GB of storage isn’t enough, you can upgrade your plan by going to System Preferences > iCloud > Manage and clicking on Storage Plan or Buy More Storage.
How to access iCloud Photos on an iOS device
While your Mac is likely to be your main hub for organizing and editing photos, your iPhone or iPad is the device you'll use to snap all of those lovely photos.
To access the iCloud from iPhone, iPad, iPod Touch, or Apple TV first you’ll need to turn it on. In iOS 10.3 or later, do this by going to Settings > [name] > iCloud > Photos, then turn on iCloud Photo Library.
In iOS 10.2 or earlier, go to Settings > iCloud > Photos.
On Apple TV tvOS 9.2 or later, go to Settings > Accounts > iCloud > iCloud Photo Library.
Now, iCloud storage access of all photos and videos can be had by using the Photos app.
How to access iCloud drive from a browser
Icloud Photos
If you don’t have your Mac or iOS device, you’ll be pleased to know that you can also access iCloud from a PC, Android, or Windows device using your preferred browser.
All you need to do is go to iCloud.com and login in using your Apple ID. Once you’re logged in, click on the iCloud Drive button to manage your account in the same way that you would on your Mac.
Icloud Library Not Updating
Keep the photos you need, get rid of the ones you don’t
Enabling the iCloud Photo Library across all of your devices is the best way to organize and manage your photos, and keep your precious memories close to hand at all times. However, you should always be mindful of space. If you shoot as many videos as you take photos, iCloud’s 5GB of free storage can be maxed out fast, leaving you unable to backup media files until you upgrade or delete unwanted photos.
With the Photo Library enabled, make a regular habit of using CleanMyMac to delete unneeded photos and manage space with iCloud’s optimize feature.
CleanMyMac X makes it easy to rid your Mac of old photos and videos to ensure your iCloud Photo Library only syncs the things you need. Download the app for free today.