Mac Not Syncing With Icloud Photo Library
Sometimes, all it takes to fix the iCloud Photo Library not syncing issue is a simple reset. Go to your phone’s Settings iCloud Photos and turn off the option of “iCloud Photo Library”. Restart your device and follow the same drill. Though, this time you have to turn on the option instead. ICloud Photo syncing allows you to access photos taken from your iPhone from any device in your Apple ecosystem. But after updating to macOS Catalina, iClould photo library might stop syncing on your macOS 10.15 as one of the problems arising from the new update. Jun 11, 2018 Fixes to 'iCloud Photo Library not syncing'. Connect your iPhones to your computer. Open EaseUS MobiMover, then go to Pictures Photos. You can also use the data transfer feature. Choose the photos or albums you want to move from one iPhone to another (set the source. In the Finder on your Mac, select the device in the Finder sidebar. Select Photos in the button bar. Note: When iCloud Photos is turned on, no photo syncing options appear when you select Photos in the button bar. Select “Sync Photos to your device from” checkbox, then choose Photos, Pictures, or a folder from the pop-up menu.
- Photos Mac Not Syncing With Icloud
- Icloud Photos Not Syncing Windows 10
- Mac Not Syncing With Icloud Photo Library App
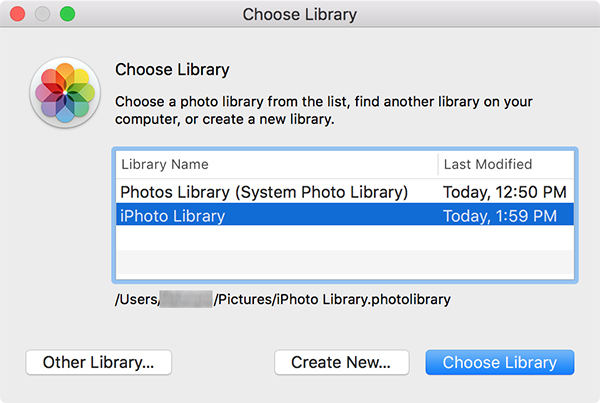
Turn off and on again the iCloud photos setting (was setto Optimize Mac Storage)(40gb free) - Repaired the Library using Option and Command Key - Runned Disk Aid. Finally Turned off icloud photo's, created a new library, set as system library, and enabeld again iCloud photo's sync. Nov 14, 2018 -Turn off and on again the iCloud photos setting (was setto Optimize Mac Storage)(40gb free) - Repaired the Library using Option and Command Key - Runned Disk Aid. Finally Turned off icloud photo's, created a new library, set as system library, and enabeld again iCloud photo's sync. Apr 01, 2020 Follow these steps to designate a System Photo Library: Quit Photos. Hold down the Option key and open Photos. One of the photo libraries is already designated as YourLibraryName (System Photo Library). Choose the library you want to designate as the System Photo Library. After Photos opens the.
iCloud for Windows leaves a lot to be desired. Be it error messages during installation or your photos failing to download locally — you will run into a fair share of headaches at one point or another. And the same goes for its integrated file syncing service — iCloud Drive.

For starters, iCloud Drive isn’t the best file cloud-storage service on Windows — it’s slow, clunky, and can take ages to upload or download files. Also, you will face instances where it fails at its job.
If you are running into any serious syncing issues with iCloud Drive, then here are a few pointers that can help you out. Try working your way through each fix in the following order, and you most likely should have iCloud Drive up and running soon.
Also on Guiding Tech
Top 5 iCloud Photo Backup Alternatives for iPhone
Read More1. Enable iCloud Drive
The first thing you must do is ensure that iCloud Drive is up and running on your computer — quite important if you just installed iCloud for Windows for the first time.
Start by clicking the iCloud icon on the system tray, followed by clicking Open iCloud Settings. On the iCloud app that shows up, make sure that the box next to iCloud Drive is checked.
If it isn’t, check it and then click Apply. That should activate iCloud Drive on your PC. To access your files, click the iCloud icon on the system tray, and then click Open iCloud Drive.
2. Check iCloud Status
Make sure that iCloud Drive isn’t down at the moment due to an issue with the Apple servers.
To do that, visit Apple’s System Status page, and then look up the status next to iCloud Drive — a green-colored dot indicated no issues, while a red-colored dot denotes the opposite.
If iCloud Drive is unavailable, wait for a few hours, and then look up the System Status page again. Once the iCloud Drive status is back to normal, expect your files to start syncing regularly.
3. Restart iCloud Drive
iCloud Drive is also susceptible to various glitches that are just temporary. A simple computer restart should suffice to get rid of them. But if you can’t restart your computer right away for some reason, you can instead quit and relaunch the iCloud app forcibly.
To do that, bring up the Task Manager (right-click the taskbar and click Task Manager). Select all iCloud processes such as iCloud Drive, iCloud Services, iCloud Photo Library, etc., and then click End Task. That should stop iCloud for Windows and all of its services.
Afterward, search for and relaunch iCloud for Windows via the Start menu. That will cause the cloud-storage service to relaunch from scratch and hopefully resume any stuck downloads or uploads.
4. Update iCloud App

Did you update iCloud for Windows recently? Usually, the latest updates contain fixes for known issues in iCloud Drive and other iCloud services. So if you haven't, make sure to do that now.
Open the Start menu, type apple software update, and press Enter. If any updates are available, apply them.
Note: If you use the Microsoft Store version of iCloud, then the app should be updated automatically. But if automatic updates are turned off for your PC, open the Microsoft Store, click Download and Updates on the Microsoft Store menu, and then apply any updates for iCloud if available.5. Check Internet Connection
Don’t discount the fact that the problem with iCloud Drive could be due to spotty internet connectivity. If you have direct access to the router, try turning it off for several seconds before switching it back on. That could take care of any minor connectivity issues on the router-side.
Alternatively, try connecting to a different Wi-Fi hotspot and check if that causes iCloud Drive to resume syncing. If that fails, consider changing the default DNS service for your internet connection. Using a popular domain name system such as Google DNS can help enhance connectivity.
To do that, get to the Properties screen of your internet connection (click the Ethernet or Wi-Fi icon on the system tray, and then click Properties). Click Edit under IP Settings, select Manual, turn on the switch next to IPv4, and then insert the following DNS servers into the Preferred DNS and Alternate DNS fields.
Save your changes, and then restart your computer to start using the updated DNS servers for your internet connection.
Also on Guiding Tech
#icloud
Click here to see our icloud articles page6. Check iCloud Storage
Are you close to running out of space on iCloud? If that's the case, then your files will fail to sync among your devices. To determine if this is the case, open the iCloud app and check the storage indicator.
If you are close to running out, you must either free up some space on iCloud or upgrade to the next paid storage tier.
7. Check Local Disk Space
Do you have enough space on the primary partition of your hard drive or SSD? If not, iCloud Drive will fail to download files that were uploaded to it from other devices.
Use File Explorer to determine if you have sufficient space available. If you don't have much, then go on a cleaning spree — remove junk files, turn on Storage Sense, disable reserved storage, etc.
Alternatively, you can shift iCloud Drive to another partition or external drive.
Photos Mac Not Syncing With Icloud
8. Sign Out/Sign In
If all else failed, consider signing out and then signing back into iCloud for Windows. That could potentially nudge iCloud Drive into syncing your files again. However, you will have to redownload all of your iCloud Drive files. Also, you will have to redownload any photos and videos on iCloud Photos, from scratch. If that's something that you don't want to do right now, move onto the next fixes and come back to this later.
To sign out of iCloud, open the iCloud app, and then click Sign Out. After accepting that your files will be deleted from local storage, exit the iCloud app.
Restart your computer, sign back into iCloud for Windows, and then enable iCloud Drive and any other iCloud services that you use.
9. Use Microsoft Store Version
Apple also has a Microsoft Store version of iCloud for Windows. Despite featuring the same user interface as the traditional desktop app, the Microsoft Store version is marginally better performance-wise and features superior iCloud Drive features such as Files On-Demand and iCloud Sharing.
If you still keep running into issues using the traditional desktop version despite going through the steps above, consider switching to the Microsoft Store app. The transition process is surprisingly smooth. Check our guide on how iCloud Microsoft Store version is different from the desktop one.
Download iCloud for Windows10. Use iCloud.com Web App
This isn’t an actual fix, but if you don’t have the time to go through some of the time-consuming fixes listed above, consider using the iCloud Drive web app on iCloud.com for the time being.
The iCloud Drive web app lets you do anything — you can upload and download files, rename files and folders, share them with others, etc. The controls are also well-implemented, and you should have no trouble using them.
Also on Guiding Tech
Why Should You Backup iPhone to iCloud or Computer
Read MoreBack on the Road
Hopefully, the fixes above helped you out, and iCloud Drive is back to syncing your data without issues. But if you didn't already, make it a point to switch to the Microsoft Store version sooner rather than later — it's a definite improvement over the desktop version of iCloud, and you should see far fewer sync issues. Just don't expect it to solve all iCloud-related problems.
Next up: Searching for an iCloud Drive alternative? Try Google Drive. It's quite good.
Icloud Photos Not Syncing Windows 10
Read NextiCloud vs Google Drive: In-Depth Comparison of Cloud Storage ServicesAlso See#windows 10 #troubleshootingDid You Know
Cortana is integrated with Microsoft Edge.
Mac Not Syncing With Icloud Photo Library App
More in Windows
5 Fixes for Microsoft Teams Microphone Not Working on Windows 10
How it works
iCloud Photos automatically keeps every photo and video you take in iCloud, so you can access your library from any device, anytime you want. Any changes you make to your collection on one device change on your other devices too. Your photos and videos are organized into Years, Months, Days, and All Photos.And all of your Memories and People are updated everywhere. That way you can quickly find the moment, family member, or friend you're looking for.
Your collection uploads to iCloud each time your device connects to Wi-Fi and your battery is charged. When you have iOS 11 or later, your library can update over cellular too. Depending on your Internet speed, the time it takes for you to see your photos and videos on all of your devices and iCloud.com might vary.
Before you begin
- Update your iPhone, iPad, or iPod touch to the latest iOS or iPadOS, your Mac to the latest macOS, and your Apple TV to the latest tvOS.
- Set up iCloud on all of your devices.
- Make sure that you’re signed in to iCloud with the same Apple ID on all of your devices that you want to use with iCloud Photos.
- If you have a Windows PC, update to Windows 7 or later and download iCloud for Windows.
Turn on iCloud Photos
- On your iPhone, iPad, or iPod touch, go to Settings > [your name] > iCloud > Photos, then turn on iCloud Photos.
- On your Mac, go to System Preferences > Apple ID. Click iCloud in the sidebar, then select Photos. If you have an earlier version of macOS, go to System Preferences > iCloud. Click Options next to Photos, then select iCloud Photos.
- On Apple TV 4K and Apple TV HD, go to Settings > Users and Accounts > iCloud. Then turn on iCloud Photos.
- On your Windows PC, follow these steps.
In earlier versions of iOS, macOS, tvOS, and iCloud for Windows, iCloud Photos was called iCloud Photo Library.
See your edits on all of your devices
When you make edits in the Photos app on your iOS or iPadOS device or on your Mac, the photo automatically updates across all your devices. So when you crop or enhance a photo from your iPhone, you see the changes when you access your library from your Mac. Your original photos and videos are stored in iCloud and you can go back to them at any time, and revert any changes you made.
The photos and videos that you delete on one device are deleted everywhere that you use iCloud Photos. Photos and videos stay in the Recently Deleted folder for 30 days before they're deleted permanently.
You can make edits on your iPhone, iPad, iPod touch, or Mac, and you’ll see them on your Apple TV automatically. Your entire collection is available on Apple TV, including your Memories and shared albums.
File types that you can use with iCloud Photos
Your photos and videos are stored in iCloud exactly as you took them. All of your images are held in their original formats at full resolution — HEIF, JPEG, RAW, PNG, GIF, TIFF, HEVC, and MP4 — as well as special formats you capture with your iPhone, like slo-mo, time-lapse, 4K videos, and Live Photos.
Back up your photos and videos
When you turn on iCloud Photos, your photos and videos automatically upload to iCloud. They're not duplicated in your iCloud backup, so you should keep backup copies of your library. You can download your photos and videos from iCloud.com to your computer and store them as a separate library, transfer them to another computer with Image Capture or Photos, or store them on a separate drive.
If you're on a device with iOS 11 or later or macOS High Sierra or later, the photos and videos you take are in HEIF and HEVC format. These formats use less storage, with the same quality.
Download your photos and videos
You can download a copy of your original photos or videos on iCloud.com, iOS, iPadOS, or Mac.
- On iCloud.com, click Photos, then select the photos and videos that you want to download. Click and hold the download button in the upper-right corner of the window. If you want to download your content as it was originally captured or imported, choose Unmodified Original. For JPEG or H.264 format — including edits, and even if it was orginally in HEIF or HEVC format — choose Most Compatible. Click download.
- On iOS and iPadOS, you can use AirDrop: in the Photos app, select some photos or videos. Tap the share button , then select the device that you want to share with. Learn more about using AirDrop.
- On Mac, select one or more photos. Drag the content to your desktop, or right-click and select Share > AirDrop.
Make sure that you have enough storage
The photos and videos that you keep in iCloud Photos use your iCloud storage and your device storage. And as long as you have enough space in iCloud and on your device, you can store as many photos and videos as you like.
When you sign up for iCloud, you automatically get 5GB of free storage. If you need more space, you can buy more iCloud storage. Plans start at 50GB for $0.99 (USD) a month. If you choose 200GB or 2TB plans, you can share your storage with family.
Learn more about plans and prices in your region.
Save space on your device
iCloud Photos keeps all your photos and videos in their original, high-resolution version. You can save space on your device when you turn on Optimize Storage.
On your iPhone, iPad, or iPod touch:
- Go to Settings > [your name] > iCloud.
- Tap Photos.
- Choose Optimize [device] Storage.
On your Mac:
- Open the Photos app and click Photos in the menu bar.
- Click Preferences.
- Go to the iCloud tab and choose a storage setting.
If you turn on Optimize Storage, iCloud Photos automatically manages the size of your library on your device. Your original photos and videos are stored in iCloud and space-saving versions are kept on your device. Your library is optimized only when you need space, starting with the photos and videos you access least. You can download the original photos and videos over Wi-Fi or cellular when you need them. You can use Optimize Storage on your iPhone, iPad, iPod touch, and Mac.
If you turn on Download Originals, iCloud Photos keeps your original, full-resolution photos and videos in iCloud and on your device.
Pause library uploads to iCloud
When you turn on iCloud Photos, the time it takes for your photos and videos to upload to iCloud depends on the size of your collection and your Internet speed. If you have a large collection of photos and videos, your upload might take more time than usual. You can see the status and pause the upload for one day.
- On your iPhone, iPad, or iPod touch, go to Settings > [your name] > iCloud > Photos. You can also open the Photos app, go to the Photos tab, and scroll to the bottom of your screen.
- On your Mac, open the Photos app. Select Photos in the sidebar, then click All Photos in the list of tabs in the toolbar. Scroll to the bottom of your photos and click Pause.
Learn more
- Rediscover favorite and forgotten occasions from your photo library with Memories.
- Find your missing photos or delete the ones that you don't want anymore.